
Jenkins provides us
with various options in building the code. On the other hand, git provides us
with the Source code management system. Jenkins provides us with various
plug-ins in dealing with various repository systems. In this article we will
see how we can configure Jenkins with the local Git Repository System.
This article will
explain you on how to create a maven web application and use the git
repository. The final step is to use the Jenkins with Git in building and
packing into a war file.
1) Create a
directory SampleTest
2) Inside the
sampleTest , run the maven web application command as,
mvn
archetype:generate -DgroupId=com.git.testing -DartifactId= sampleTest
-DarchetypeArtifactId=maven-archetype-webapp -DinteractiveMode=false
[root@vx111a
testing]# git status
# On branch master
#
# Initial commit
#
# Untracked files:
# (use "git add <file>..." to
include in what will be committed)
#
# sampleTest /
nothing added to
commit but untracked files present (use "git add" to track)
[root@vx111a
testing]# ll
total 0
drwxr-xr-x. 3 root
root 30 Dec 3 14:47 sampleTest
3) Git add and
commit
[root@vx111a
testing]# git add .
[root@vx111a
testing]# git status
# On branch master
#
# Initial commit
#
# Changes to be
committed:
# (use "git rm --cached
<file>..." to unstage)
#
# new file: sampleTest /pom.xml
# new file: sampleTest /src/main/webapp/WEB-INF/web.xml
# new file: sampleTest /src/main/webapp/index.jsp
#
[root@vx111a
testing]# git commit -m "Jenkins Testing with Local Repo"
[master
(root-commit) 551c28c] Jenkins Testing with Local Repo
3 files changed, 33 insertions(+)
create mode 100644 sampleTest /pom.xml
create mode 100644 sampleTest
/src/main/webapp/WEB-INF/web.xml
create mode 100644 sampleTest
/src/main/webapp/index.jsp
Now if we check the
git status, we can see the no untracked files.
[root@vx111a
testing]# git status
# On branch master
nothing to commit,
working directory clean
Configuring Jenkins
Once the maven
application is done and git is configured, the next step is configure local git
to jenkins in such a way that the jenkins build the locally developed code.
1) Download the
Git-plugin using the manage Jenkins in the jenkins Web. Select the Manage
Plug-in tab, go to the Available section and search for the GIT plugin. Once
Obtained , check the plugin and click "Download now and install after
restart"

2) The Installation
goes with the plug-in installation and restart of the Jenkins

3) Now we will see how we
use the installed plug-in along with local git repository to build the maven
web application. For this choose the new Item and check for the "Maven
project" . Give a Name to the item and click ok.

4) In the next page
of the build item, there are certain
configurations that needs to be done.
Provide the Git
Executable location
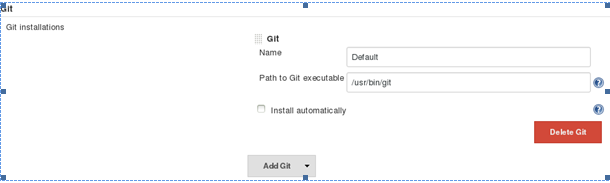
Provide the Git repository
user name and Email Details

Now this is the
important part, For building the code from our local git repository and build
the code we need to specify the path to the local Git repo as file:// protocol
like this:
file:///home/ay/dev/projects/my_new_project
Now for our project
we need to configure the Git repository details as,

Provide the Local
Git Credentials. This is one of the important Step in getting the source code
from the local Git repository.
Click on the Add
credentials under the Repositories in the above screen and provide the
credentials that we are using for the local repository

Now once the changes are
done run the Build now command and see the Console output to get the war file
generation

No comments :
Post a Comment